Posts

Showing posts with the label basic IT

How to create a unique target chart in Excel - Video tutorial

Image

In cell vs target chart - video tutorial

Image

In cell vs target chart in Excel

Image
Hello everyone and welcome to another tutorial where this time we're going to follow through our last exercise where we tweak some things and finish it off with a chart.     1 Step one, select the columns from A to T (or to any column you feel it's far enough), Right Click > Column width and set it to 17.      2.  Step two, fill in the cells with the order you see in the picture down bellow.    3.  Step three, under  Conditional Formatting format the new rule and under Value > Maximum make sure you select the cell right beside Goal.  You probably know by now how you're supposed to format your new rule. If you're new to this tutorial then please visit our last exercise:  https://letslearnitnow.blogspot.com/2020/04/how-to-create-actual-cell-vs-target.html    4. After you've successfully created the new rule, please do edit and format the table so it will have that clean l...

How to create an in cell vs target graph in Excel - Video tutorial

Image

How to create an actual cell vs target graph in Excel

Image
Hello everyone and welcome to another tutorial where this time we're going to see how you can make a very quick and simple actual cell vs target graph in Microsoft Excel in just a few easy steps.      1.   First step, fill in the cells as seen on the picture bellow and write down the benchmark of units sold on the target or goal cell. Now that we have the benchmark of 100 units sold as our primary goal, head over to the actual cell and write down a random or in your case the actual number of units sold. Once you've done that on the graph cell type =D5  as seen on the picture where we will use the formula to show the graph in the next step.     2. Step two, once you click enter you will notice on the graph bar the progress is 50 units of the 100 target units sold. To add the graph go to Conditional formatting > New rule     3. When the New Formatting Rule window opens head over to Format Style and set it ...

How to create a data entry form in Excel that includes math formulas - Video showcase

Image

How to create a simple student data entry in Excel - video showcase

Image

How to create a simple student data entry in Excel

Image
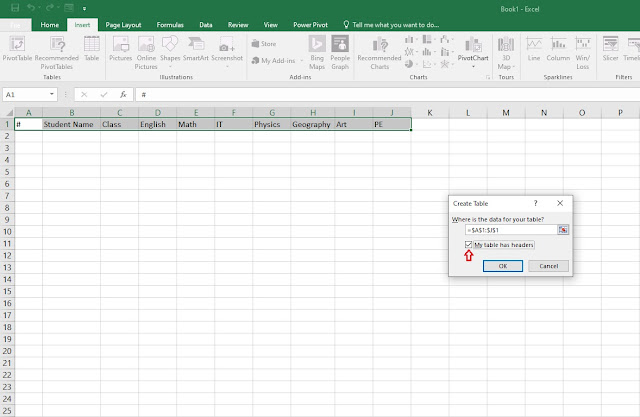
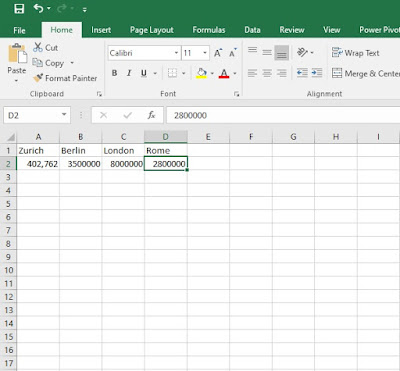
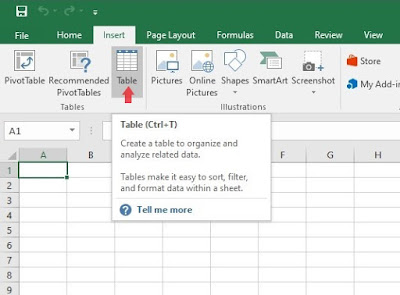
Here's a very easy and simple student data entry tutorial that I'm going to show you how to do it in very easy steps. Once you get around this tutorial you can create one for yourself using different categories, depends how it suits your best needs. So, let's get started!     1. First step, write down the categories as seen on the picture below, select all the cells > insert table > My table has headers > OK.    2. Step two, once you've created the table go to File > Options.     3. Step three, once you click options, a window under the name excel options is going to appear where we have to enable the data entry form command.   - Click the Quick Access Toolbar and under Choose commands form select Commands not in ribbon.    - Scroll down until you find Form, click the ADD>> button until the Form is   shown on the right window and click OK.      4. Step four, aft...

How to create a simple database in Excel - Video showcase

Image

How to create a simple database in Excel

Image
In this step by step guide, I'm going to show you how to create a quick and simple database using Microsoft Excel. Even if you've just started using Excel for the very first time this tutorial doesn't require any intermediate skills, all you have to do is follow the logic behind the steps that will create this database function. For this database we're going to use the DSUM, DAVARAGE, DMAX and DMIN functions.      1. Step one, have an idea on what your database will consist of, in my example I have used a simple smartphone database. So, from cells A6 to F6  write down the categories on what your database will consist of and whats you did that make sure you highlight the categories with Bold and fill the cells below with the required information. As you can see from the example below I have filled the necessary information to each category.   - Once you're finished with the first step, note that as seen in the example below in the highlighted cells...

How to create mortgage calculator in Excel

Image
In this tutorial I'm going to show you a step by step guide on how to create a mortgage calculator in Excel. Creating this mortgage calculator doesn't require any demanding skills, as long as you remember the formulas It's quite easy to create one.    1. Step one, under A1 write down "mortgage calculator" and continue writing down the cells as in the picture below:            A4: House Price                                    A12: Breakdown of Payments      A5: Down Payment                               A13: Payment Period      A6: Amount Borrowed                           A14: Principal Paid       A8: Monthly Payment       ...

Video showcase on how to create a graph chart in Excel

Image

How to create a graph chart in Excel

Image
 Hello everyone and welcome to another tutorial where this time I'm going to show you a simple step by step tutorial on how to create a graph in Excel in just under a minute.   Firstly , before you start open Excel under a blank workbook and for a more simplified execution of this task as an example I'm using here city names and their population, that's what our graph is going to consist of.       1.  First step what you're going to do is on the A1 to D1 column   write the city names that you would want to use. After you've done that, on the A2  to D2 column write the population of those cities as in my example.     2. Step two, (make sure you've selected all the columns from A1 to D2 ) go to Insert and select the desired graph that you would want to use. In my case it's Insert statistic chart.  As you can see from the picture below, on the red rectangle you can select different graphs and charts to choose f...

Video showcase on how to create a table in Excel

Image

How to create a table in Excel

Image
Hello everyone. In this tutorial I'm going to show you a step by step method on how to create a simple table on Excel in just under a minute.                         1. Step one,   open Microsoft Excel under a blank page and simply go to Insert > Table.    2.  Step two, a small window will appear under the name " create table". Once that does, simply point the mouse cursor on the column you wish to create the table, in my case it's from A1  to  H15 . Before you click on the desired column, press shift + H15  (desired column). Click OK and you'll have the table ready as seen below. 3. Step three, if you want to quickly edit your table and want to rename the headlines on the table just double click on the columns (headlines) and start typing. In my case I have written the week days as follows: Monday, Tuesday, Wednesday, Thursday...  Quick tip to...